Introduction
I’ve always leaned towards writing more long-form pieces/novel writing. In fact, I would go as far to say that it’s a weakness of mine. I struggle to come up and work with ideas that work in a contained setting. Like a short story. I always want to expand on this or run with that. And before I know it, I’m way over my word count and stuck shaving down my work to its barest essentials. Writing short-form is an art I’m still struggling to grasp the basics of. But long-form on the other hand is more like a friend I’ve known for a long time.
After thinking about it, I decided I wanted to document and share how I approach novel writing. I’m a very methodical writer. I like to follow steps and procedures. And I find that by working within a known set of perimeters, I can really allow my creativity to run free. Not all writers would agree. There are plenty of writers that prefer to sit down and go wherever their heart takes with them. And there’s nothing wrong with that. As I’ve mentioned in previous posts, there is no incorrect way to write. It’s all about finding what works for you.
I just wanted to put this novel writing guide out there for new writers that were like me. Writers who craved structure but had no clue what that structure would look like. Let alone how to build one. If that sounds like you, I highly recommend you stick around and listen to what I’ve got to say! Take what works and discard what doesn’t. Tweak things, rearrange the steps, push the furniture around and see what looks best.
Snowflake Method
Before we start diving into the steps for novel writing, I want to give credit where it’s due. The base of my style of novel writing is based on Randy Ingermanson’s Snowflake Method. More specifically, Ingermanson’s book, “How to Write a Novel Using the Snowflake Method.” Before I knew I wanted to be a writer, I wanted to be an engineer like my uncle. He was ecstatic about this and began planning out my future. He was going to introduce me to his best coworkers, host me during my college years, and get me a job at the same company. It brought him great joy to imagine me following in his footsteps. However, it wasn’t meant to be and it was with regret and apprehension that I told him what my new plans were.
He was disappointed, of course, but he understood that I needed to follow my own path. And he was sure to tell me that as long as I was happy, that’s what mattered to him the most. I understood this but deep down wondered if his disappointment would affect our relationship, would he ever truly accept what I wanted to do? Then, one Christmas morning those worries disappeared. My uncle had sent me a gift through the mail. A copy of Ingermanson’s, “How to Write a Novel Using the Snowflake Method,” along with a card expressing his pride and support.
It was the first gift I received accepting my identity as a writer and my uncle became the first adult to champion my future career. Despite his disappointment in me not becoming an engineer like him. This gift meant the world to me then and it still does now. And it became one of the cornerstones of my writing, particularly my novel writing.
This book is full of wonderful insights, is fun to read, and is the base of the structure I follow now. I highly recommend you pick up a copy yourself and see what you can take away from it. But without further ado, let me break down how I approach novel writing!
Step 1: Concept
I always start with my concept. What do I mean by concept? A concept in this scenario is the absolute bare-bones of the plot and the world your story takes place in. It’s the basic idea, the spark that fuels the whole novel. Often I find these in a specific notebook I keep on my shelf. A notebook entirely dedicated to random ideas I get, characters I dream up, or even writing prompts that catch my eye.
If you don’t have a notebook or document where you keep all these, I recommend you start one. Having all that inspiration in one place is convenient and becomes your first stop when writing block inevitability hits. When you’re feeling uninspired, you can turn to this notebook and start flipping through it, drawing inspiration handed down by your past self. Plus it gives you a place to quickly jot down those ideas that seemingly come out nowhere and hit you like a truck, before being lost forever.
You may have to flesh out your concept a bit if it’s vague. I usually write it out like a blurb you’d find on the back of a book. For example, if your first idea is something like, “An old-western style bar in outer space,” you might want to add details like different characters or where the plot would be headed. So something like,
“Character A runs an old-western style bar in the depths of Galaxy X on Planet Y. But when Character B, a mercenary for hire on the run from their most recent target (Character C), crashes in right before closing, Character A has a decision to make. They decide to hide Character B, catching the ire of Character C and dragging them into a chain of events they could’ve never expected.”
It doesn’t need to be fully fleshed out, those details can come in later. It just needs to be: enough to get the general setting across, a direction for your plot to go, and the start of a main cast. I find coming up with character/location names at this step slows my momentum. Names are one of the hardest steps for me, consistently. So instead I leave a placeholder like, “Character A,” or “City X,” so I can focus on the story itself.
Once you feel like you have a good grasp of your concept, you can move towards filling in some of those blanks.
Step 2: Lists, lists, lists
I sort the missing details into different lists, which helps me keep track of not only what’s missing, but keep all those details together in a place that I can easily return to while writing. That way I don’t have to sift through pages and pages of notes to find the name of a minor character or a city the characters only visit once. The first list I usually come up with is my character list.
Which is exactly what it sounds like. It’s an ongoing list of every character (or almost every character) that appears within your novel. I usually start with “Character A” or the main character. With “Character B” being another main character, love interest, or an important side character. Typically “Character C” is the main antagonist of the story. From there, you can start to think about what other characters may appear. Does Character A have any other friends/comrades? A family? How about Character C? Do they have henchmen or loyal followers? Is there a miscellaneous side character that plays a minor role towards the beginning of the novel?
Start listing any characters you think may be significant, using the alphabet. I find that I rarely even get close to 26 characters, giving you more than enough slots to fill. This list isn’t set in stone either, instead, meant to be updated as you write. Add characters as they’re needed or even remove them if necessary.
I typically also list out the different locations my characters will have to visit. This includes the names of cities, buildings, and even planets. Much like the character list, these are also meant to be updated as you write.
Step 3: Character Creation/World Building
Now that you’ve planted the seeds meant to be your characters and world, it’s time to spend some time encouraging them to grow. If you don’t already have names for your characters, this is the step to do so! Past this point, keeping track of and using placeholders may be confusing, especially for characters. Locations and buildings might be able to wait longer if you’re really struggling to come up with the best name. However, I try to do this all at once so I don’t accidentally leave “City X” as City X.
Once you have your names, it’s time to start thinking about your characters at a deeper, more detailed level. This includes details like your character’s appearance. What do they look like? How would you describe them? Are they tall? Short? Do they have a specific style?
This also includes different character traits and values. How do they act with people outside their circle vs people within their circle? Are they more optimistic? Pessimistic? A realist? What’s their main goal in the novel? Goals and motivations are key for creating realistic, interesting characters. And they also determine how your character reacts and responds to the actions of others/the world around them.
It’s extremely difficult to answer these questions and more off the top of your head. You may need to spend some time getting to know your characters. I use multiple sites and tools at this point, ones that encourage me to explore my characters and help me keep track of all these details.
For getting the base of my characters, I use character building sites like notebook.ai. There may be other sites that work better for you, ones that include more or less details. I use notebook.ai for my characters only, sticking to the free version. I like that it asks a lot of questions about what my characters look like, along with minor details that I probably wouldn’t think to ask. Like their favorite food or color, something that isn’t likely to come up in the story, but helps me humanize my characters in my mind. It’s also small details like that help to solidify the bigger details.
For example, I have a character who grew up in a small town in the south, and struggles with the contradictory feelings of nostalgia for her town and the hurtful discrimination she faced while living there. So her favorite food is a southern dish, one she looks back on with fondness, but also reminds her of a difficult time in her life.
If you’re really struggling to give words to your character’s traits/assign values to them, I have another method I use. I find that taking personality tests from my character’s perspective helps me understand them at a deeper level. There are tests like 16 personalities, which admittedly aren’t my favorite, but still give helpful information and help you think about your character’s worldview. I usually lean towards enneagram tests, as I find them to be more detailed and give insight into what matters most to your characters.
I also recommend checking out this article I wrote about character strengths/weaknesses if you’re looking for more tips and tricks!
Once you feel like you have a good grasp of your characters (what kind of people they are, their driving values, etc), you can move on to building the actual plot of your novel.
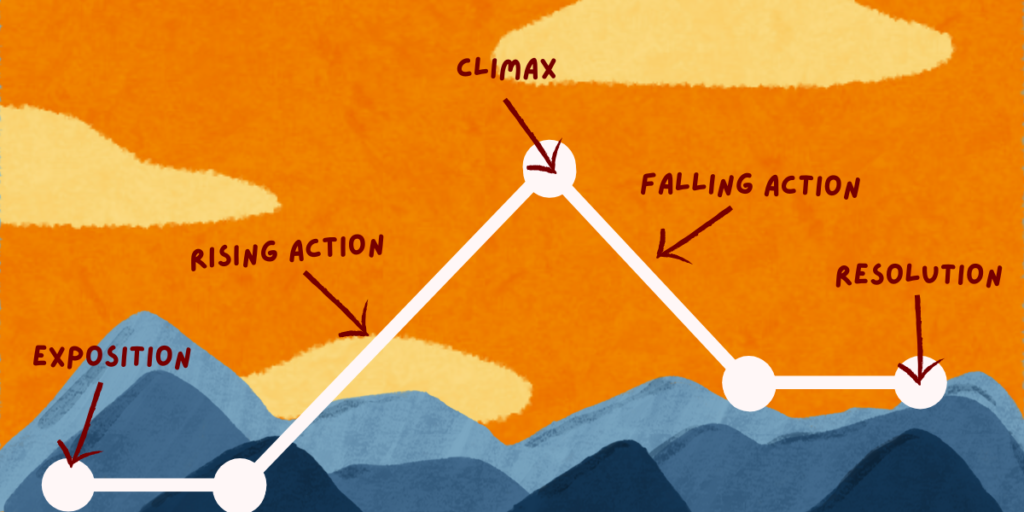
Step 4: Plot Mountain
You might remember this little device from your elementary school English classes. Plot mountain is a diagram that displays all the basic parts to any fiction story. Starting with the exposition (the beginning), leading upwards with the rising action (all events that lead to the climax). Until we hit the peak of the mountain, the climax (the most “important” moment of the entire plot), before leading back downwards with the falling action (events that take place after the climax), and finally ending with the resolution (the end of the story). All stories follow this structure, hence why it’s often used to break down the essentials of storytelling to children. It’s often used to help them understand the key moments of whatever book they’re reading. However, I use it as the scaffolding in my novel writing.
All stories have a beginning, middle, and end. Unless you don’t finish writing them! With that in mind, these three sections are a great place to start. How does your story begin? What is the moment that pushes the first domino, sending the rest falling one after the other? In the example given in the concept, this would be the moment Character B crashes into Character A’s bar, and the moments leading up to that.
Once I have my beginning, I typically like to skip over the climax and think about how I want the story to end. This can start off vague as you spend some time debating what exactly that ending will look like. Will this story have a happy ending? A sad, tear jerking ending? A bittersweet one? Or will it be left somewhat open-ended, paving the way for a sequel in the future. If we return to the example, I’d say I want this story to end happily, returning to the bar to spend the rest of their days as unstoppable, tag teaming, bartending mercenaries.
After coming up with at least a vague idea of how your novel will end, you can backtrack to the climax. What is the key moment? It might be the most action packed. Or the most emotional. Maybe it’s a breakthrough moment, where your main character has a eureka moment, and everything falls into place. Either way, it must be the turning point that allows your ending to come to fruition.
In our example, I imagine that the climax has to be the moment where Character A and Character B finally triumph over Character C. Maybe Character C offers to spare Character A, if they betray Character B. But when they refuse, they face Character C head-on in an all out battle. Which they win after much strife.
In three simple steps, you’ve outlined the most important moments of your novel! Giving you a basic framework to build a larger, more complex plot. For me, plot mountain is an excellent tool to use in novel writing.
Step 5: Filling in the Gaps
You now have the bare bones of a plot. A beginning, middle, and end. Now, you have to start bridging the gap between the three. While working on the previous steps, you might’ve come up with a few different moments you want to include already. This is a great time to find out when and where it’s most appropriate to put those scenes. For example, one scene we might want to include would be Character A and Character discussing how they ended up in their respective careers.
This would need to happen in the rising exposition, as it most likely wouldn’t fit thematically in the falling action, and would serve as a moment where Character A and Character get closer to each other. I’d also say it would happen in the first half of the rising exposition, when they’re just starting to get to know each other. Using logic like this and your own judgement, start to put the pieces together, forming the plot of your novel.
I typically brainstorm different scenes for my novels on a piece of paper. When I do this, I don’t necessarily worry about when/where it will happen. Instead, I put my energy into creating as many different ideas as possible. After looking all your ideas over, then you can try putting different scenes in different places, seeing where and if they fit.
If you’re struggling to come up with multiple scenes, start with one scene, your climax, or your ending. Sometimes moving in a non-linear way can help jog your creativity. It also helps ensure all your scenes blend together nicely. For example, if we start at the climax and move backwards, we have to think about the scene before it. In order to fight Character C, either they have to find Character C or Character C has to find them. Afterall, it’s hard to fight someone if they aren’t in front of you!
Once I have a good amount of scenes and feel like I have a well rounded, full plot, I typically list them out in chronological order. I call this my plot point list. This helps me break down my novel in a easy-to-understand way. I can then read over my entire plot, see if there’s any missing links, and mark them off as I write.
Like my other lists, the plot point list is meant to be in flux. Sometimes while I’m writing, I find that my next scene actually isn’t fitting at all. Maybe a slight change is needed, maybe it needs to be completely overhauled. Sometimes I find myself deleting entire scenes or switching them around. While I like being methodical, organized, and prepared in my novel writing, I also recognize that I don’t 100% know what it will look like in the end. Do what feels right according to you, your characters, and the world you’re trying to create.
Conclusion
Thank you all so much for reading my very basic novel writing guide! If you have any questions or want me to go into further detail on any of the steps, let me know in the comments below! I’d also love to hear any feedback you may have and if you found this to be helpful. Happy writing and I wish you all the best on your first drafts!
Leave a Reply